As a surprise when Carie was gone, I converted her board into a splitboard. I documented the process, but haven't posted it until now because I didn't want Carie to see it. Note to snowboarders: I'm pretty sure it's actually easier to learn how to ski than to convert a board to a splitboard. You should just go do that. In the end it turned out very nicely, though. I found this forum post to be extremely helpful. Oddly enough he's also a skier making a splitboard for the missus. Funny how that works out. If you ever want to do this, check his photo essay out: it's much better than the directions or my post.
Also, I must plug climbingskinsdirect.com. The skins are superior to my Black Diamond Ascensions in nearly every way and way cheaper. 130mm skins (plenty wide for a splitboard) were $99.
Finally, I need to thank Jeannie for her moral support throughout this (and David for making fun of me, which is his own form of moral support). Without them to blab to about this I wouldn't have been able to do it, nor would I have been able to keep it a secret from Carie for so long. so without further ado, the pictures:
 Carie's board measured and ready to cut. I hacksawed the tip and tail to prevent the table saw from ripping the edge out.
 For reasons unclear to everyone (including herself), our friend Alyssa owns a table saw despite living in an urban studio apartment. Handy to borrow, though.
 A long breathless cut later...
 I sealed the inside edges with marine epoxy for longevity.
 A closer look at the sealed edge. It's funny how easily rocks eat up your bases, but damn is that stuff hard to file or cut. I spent forever cleaning the edge of the ptex to a nice bevel.
 Countersunk holes for the clips...
 ...and the bolts in and sealed with marine epoxy. I went through a tube and a half of the stuff on this project. Great stuff, though.
 And the pivoting clips are mounted.
 Mounting the climbing bracket. I actually didn't take many pics of what I had to do to the base of the board here in order to protect the innocent. If you must see, I refer to you the forum post. It's ugly.
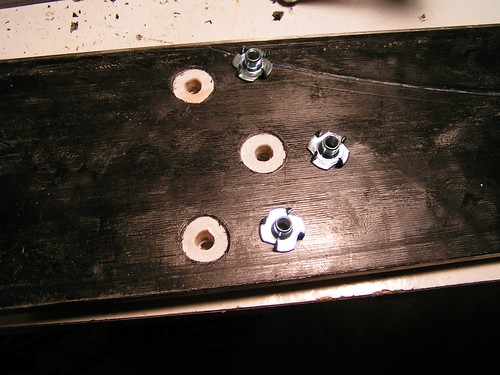
 Climbing posts as well, same evil process.
 And there's a board ready for the slider rails to be mounted.
 Measure several times, drill once. I used some tape as a drill stop; very effective. I'll have to remember that next time I mount some skis.
 Add the tip clips, and it's done!
 Touring mode.
Skins are trimmed, bases are waxed, and this thing is ready to go. Too bad it's summer in LA right now. It'll get use this winter.
Since this was Carie's only board, I though it necessary that I get her a replacement for her in-bounds activities . At the REI used gear sale, in addition to picking up up AT bindings for ultra cheap (which I'll sell to supplant the cost of the splitboard), I also picked up an Arbor Push board for a very nice price. It had been returned after a single use because there was 1/2" of minor delamination on the tail; a little bit of epoxy later and it's good as new. The base and edges are pristine. I mounted it with some Drake bindings from brociety and it's ready to rip.
 So purdy (for a snowboard, that is)!
Congrats and good work! Can't wait to get her out to use it!
ReplyDeletenice work! I remember sawing mine in two, very scary. good idea using a used board, and getting a new board for resort. looks nice.
ReplyDeleteCan't WAIT to ride both of these. Awesome job, my dear! Winter can't arrive fast enough.
ReplyDelete